> For the complete documentation index, see [llms.txt](https://help.docexport.com/llms.txt). Markdown versions of documentation pages are available by appending `.md` to page URLs; this page is available as [Markdown](https://help.docexport.com/template/item-updates.md).
# Item Updates
Create tables with your item updates on your documents. Example use case: meeting notes and communication on item level.
## Working with item update template
Use the instructions from this article to create a Microsoft Word (docx) template from scratch or download our item update template here:
{% file src="/files/Ql4iykZ9k6TxrHvDkoYL" %}
This is what the Item Update template looks like as a PDF:
This is what the structure looks like:
## Create a template & table from scratch
Insert a table in Microsoft Word (or Google Docs). Usually, you only need two rows: one for the headings and one for the placeholders.
The second row (left column) needs to start with the placeholder **`{{TableStart:Updates}}`** and ends (right column) with **`{{TableEnd:Updates}}`**\
The second row will automatically replicate itself by the numbers of subitems in the exported PDF.
In between, insert the placeholders you want to use in your final document:
* **`{{OnlyDate}}`** -> 24/12/2025
* **`{{Date}}`** -> 24/12/2025 13:30
* **`{{User}}`** -> John Doe
* **`{{Body}}`** -> Update Text (plain text)
* **`{{Body_Html}}`** -> Update Text (with HTML and images)
This is an example of how the structure looks like:
Result on the final PDF:
## Subitem Updates
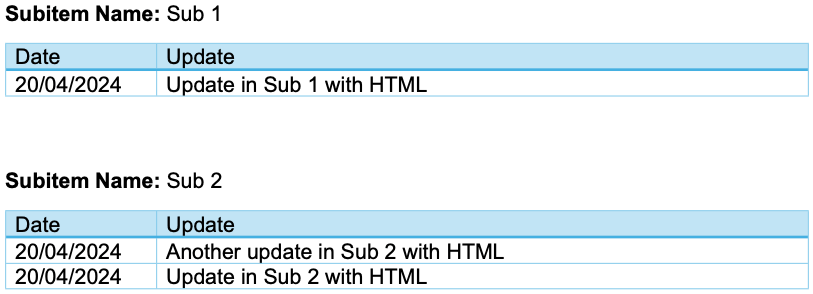
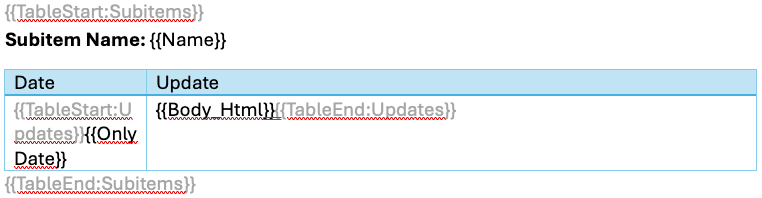
If you want to output the updates for all subitems as well, you can use the same logic, but wrap everything between **`{{TableStart:Subitems}}`** and **`{{TableEnd:Subitems}}`**
DocExport will automatically generate a table for each subitem to make it clear and structured.
The table looks like this:
Result on the final PDF:
## Item updates without table
You can also generate updates without a table using this structure:
**`{{TableStart:Updates}}`**\
**Update from `{{Date}}` by `{{User}}`**\
**`{{Body}}`**\
**`{{TableEnd:Updates}}`**
If you have two updates in your item, the result would look like this:
**Update from 19/01/2025 09:03 by John Doe**\
@Jane Smith Yes, DocExport is the most advanced generator in the marketplace.
**Update from 18/01/2025 13:35 by Jane Smith**\
Any recommendations for a good PDF Generator for monday.com?
## Updates with replies
This is the syntax if you want to include the replies for item updates as well:
**`{{TableStart:UpdatesWithReplies}}`**\
**`{{Indent}}`** Update from **`{{OnlyDate}}`** by **`{{User}}`**\
**`{{Body_Html_Indent}}`**\
**`{{TableEnd:UpdatesWithReplies}}`**
## Include only the newest item update
If you only want to include the newest update (the first in the update list) in your documents, you don't need to create a "Table:Start/Table:End" loop.
Insert these placeholders anywhere in your template:
* **`{{FirstUpdate.Body_Html}}`** -> Update Text (with HTML)
* **`{{FirstUpdate.Body}}`** -> Update Text (plain text)
* **`{{FirstUpdate.Date}}`** -> 24/12/2025
* **`{{FirstUpdate.Date | MM/dd/yyyy}}`** -> 12/24/2025 (learn more about [Date Formatting](/template/customization/format-date-and-time.md))
* **`{{FirstUpdate.Date | dd.MM.yyyy}}`** -> 24.12.2025 (learn more about [Date Formatting](/template/customization/format-date-and-time.md))
* **`{{FirstUpdate.User}}`** -> John Doe (user who created the last update)
* **`{{Image(15;0):Update.UserSmall}}`** -> Profile picture\
The "15" defines the width of the profile picture in pixels. Change it to make the size larger or smaller.
You can also load the oldest update by replacing "First" with "Last" in placeholders. For example: **`{{LastUpdate.Body}}`**
This will return the last update in your item update list.
## Items without updates
If an item has no updates, DocExport writes the text "Empty" into the document instead of leaving the section blank. You can change this text or switch it off completely in the app settings.
Follow these steps:
1. Open your monday.com board and open the **DocExport view**
2. Click on the **gear icon** in the top right corner and select **"Go to App Settings"**
3. Scroll down to **"Advanced settings"** and go to **"Placeholder for empty updates"**
4. Now you have two options:
* **Deactivate the checkbox** to remove the placeholder text. Items without updates will then show nothing in the document
* **Keep the checkbox active and replace the text** with your own wording, for example "No updates yet" or "No comments"
5. Click on **"Save"**
{% hint style="info" %}
**Note:** The setting is applied to your whole account. There is no need to repeat these steps for your other boards.
{% endhint %}



.png)

